Transaxle autopsy 1-8 | 9-16 | 17-24 | 25-32 | 33-40 | 41-48 | 49-56 | 57-60
There's an excellent article by Bill Trench on the VSAAB website on the topic of "How to Evaluate a Used Transmission."
However, if you've never seen the innards of a two-stroke or V4 SAAB transaxle, the points in the article might not mean so much to you. Or, you might just be curious about what this intimidating component looks like inside.
It happens that I've had a spare transaxle sitting around my garage for a couple of years. It was in my car when I bought it, and it worked fine -- except that it was getting a bit noisy, often the symptom of clearances loosening up in the gears and bearings. When I had a chance to buy another transaxle that had been recently rebuilt, I had it swapped in and the original, noisier one swapped out.
Undoubtedly, the best thing to do with this transaxle would have been to pack it off to Chris Moberg, Jack Lawrence, Bud Clark, Tom Donney, or one of the other marque experts with the tools and know-how to give it a full rebuild, then keep it as a spare. But that's expensive, and the transaxle hadn't been that bad when it was in the car.
So for now, I decided I'd just open it up, eyeball it for signs of serious wear or damage, replace the seals, and take a crack at adjusting the various torques and clearances. In other words, this is about all the non-expert can do without delving into the scary world of complete disassembly, replacing bearings, etc.
Since there's not much to see beforehand, we pick up the photos at the stage where I've already separated the front and rear sections of the transaxle, and removed the top and end covers.
As usual, you can click any photo to see a larger version of it.
|
|
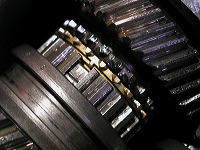
This is one of the gear shafts, as seen through the top of the gearbox with top cover removed. Thin bronze ring at center is a synchronizer.
Bill Trench's article on VSAAB says its teeth shouldn't be too thin and pointy. These teeth still have a distinct shape, so I'll assume they're okay. |
|
|
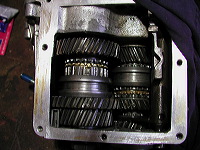
Here's a view straight down into the gearbox, with the top cover removed. By turning the gears, I can look for signs of worn or damaged teeth. No sign of major problems here. |
|
|
Now it's time to start working on the nuts on the ends of the gear shafts. Some of these are torqued to values of 90 foot-pounds or more, so it will take a lot of force to loosen them. I've already tried it with the gearbox lying horizontally on the workbench, but the box simply rolled around when I tried to twist the nuts.
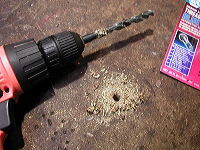
So now my plan is to stand the gearbox on end and lock it down to the workbench. I've drilled one bigger hole for the input shaft to fit through, and some smaller ones for bolts. When I drop the bolts through the gearbox mounting holes and the holes in the workbench, the gearbox should stay put. |
|
|
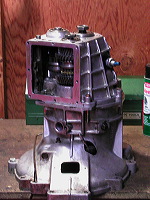
Now the gearbox is sitting upright, with the input shaft pointing down. This should make it easy to reach the nuts on the rear end of the shaft. |
|
|
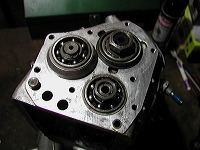
Here we're looking at the back of the gearbox, with the rear cover removed. These are the ends of the shafts that support the gears inside the gearbox.
When the gearbox is assembled, these nuts are torqued to specifications that provide the right amount of pressure on the gear teeth and ball bearings. The nuts are locked down with lockwashers to prevent them from loosening.
But as the gear teeth gradually wear, clearances between the gears open up. So, even though the nuts themselves haven't loosened (they can't, since they're locked to the shafts) they're no longer torqued to the correct values.
I'm going to try to loosen the nuts and then re-torque them. |
|
|
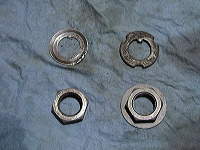
The pinion shaft nut is the most critical one. It's a left-handed nut, meaning it unscrews clockwise instead of the normal counterclockwise. It also has to be torqued to the highest value.
This high torque was a problem for the original type of lockwasher that Saab used (seen at left.) This type of lockwasher has a thin tab that fits into a slot on the shaft to keep it from rotating. You'd fold over the dished shoulder of the washer by tapping it with a hammer, to lock it over a flat of the nut.
The problem: Often, when you tried to torque the nut (bottom) it would put so much drag on the washer that the tab would break off -- as it has on this washer.
So, Saab substituted an improved type of washer and nut (seen at right.) With this hardware, the washer is much thicker, so its tab is less likely to break off. This washer is too thick to fold over, so instead the nut has a wide, flat shoulder. You tap a spot on this shoulder with a chisel, to bend it down into one of the three slots around the edge of the washer. |
|
|
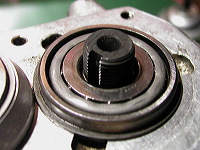
Here's the slot on the pinion shaft that accepts the tab on the lock nut (previous picture.) |
|
|
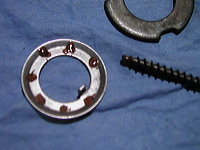
The countershaft nut doesn't require as much torque, so it can still use a conventional thin lockwasher.
Vintage SAAB expert Jack Lawrence of Motor Sports Services sold me the new nuts and washers, and also gave me some tips on how to install them. The goal of these tips is to let the nut slide smoothly across the washer, so the tab of the washer is less likely to break off.
Jack recommends first cleaning all the parts with a residue-free solvent, such as brake cleaning spray. Then, he says, put some dots of anti-seize compound around the flat side of the washer. The anti-seize compound lubricates the facing of the nut and washer, so the nut slides smoothly along it. |
1-8 | 9-16 | 17-24 | 25-32 | 33-40 | 41-48 | 49-56 | 57-60